Sunday, 18 October 2015

How To Delete All Facebook Friends Messages At Once - 2015

How To Delete All Facebook Friends Messages At Once - 2015
Facebook is commonly used and most addicting social networking platform ever. We make friends and share our feeling, through via status and messages. Facebook is best to spend time by doing chatting with friends. Even we doing chat and side by side we read some interesting stories in news feed, that why we all love Facebook most. But the only main reason behind maximum users who are using Facebook is, they love to do chat with their old friends or friend who are living at long distance. Facebook have lots of features like we play games on Facebook and even do many other activities. Facebook working hard to develop new tools and many user experience more better. As we all know their is simple funda of life 'more things we have, more issue also be there'. Facebook having huge number of bugs which are not even fixed from a long time like i posted about single name Facebook account and even we can run number of scripts to access many features as recently i share about accept all friends request at once is also the result of the external scripting.
Today i will discuss about deleting all Facebook message by single click. As we all know that messages are private portion and is very sensitive area. We share many of daily routines works, habits and even share out personal images, passwords or many other things which we can manage to share publicly. Even Lovers enjoy to chat on Facebook but in some condition we are in serious trouble and we don't have time to delete all messages one by one. To remove all conversion it takes huge time. If we have to many friends then it becomes most different part to delete all messages. So don't worry here i am going to discuss about the technique to remove or delete all Facebook messages at once.


Method To Delete All Facebook Messages At Once.

  • First Of all you need to install extension into your web browser. So here are the extension for Mozilla Firefox and Google Chrome. Download them according to your browser where you want to use.
https://addons.mozilla.org/en-us/firefox/addon/facebook-delete-all-message/

OR

https://chrome.google.com/webstore/detail/facebook-delete-all-messa/hgiidlnejdlfoacoeleopkljhbckmlko
  • After installing any of the above given extension now proceed for further instructions.
  • Login Your Facebook of which you want to delete all messages.
  • Now visit to Inbox portion and you will see all the all the messages from recent and previous conversation of all friends is visible.
  • Now click on the icon which will visible at top side of URL bar. It will only appears on Facebook after installing above given extensions.
facebook delete all message extension
  • When you click the icon it prompt the alert message for you to confirm that you want to delete all Facebook messages or not.
  • After that click on Load Older Threads button to delete conversion for the rest of friends.
deleted all facebook friends messages conversations at once
  • It will hardly take 10-20 sec to complete all task of deletion. 

HOW TO CHANGE FACEBOOK PROFILE NAME AFTER NAME LIMITS REACHED

Your Facebook Account Name limit is Reached or Exceeded?
So do you want to change your Facebook Profile Name after Name Limit reach? 😉
If so, just follow the simple method written below,
Mostly many people don’t know that facebook keeps some limits for Pages, Profiles, Groups, Friends, Events etc. Just like we can’t change a facebook profile name after 5 times, we can’t change our profile username more than 1 time, we can’t change a facebook page name after 200 Likes, we can’t change a facebook group name after reaching 250 members, we can’t add more than 5000 friends to our facebook profile and it is not possible to change the name of an event if it has more than 5000 people invited.

Nowadays, I’ve seen many keeping their facebook profile names in Different stylishFonts like ȼɦǿȼLąty ÞrîñçéNitesh Iı’e Belııve’ııŋ Mąh-selfІі’є-єм Ѕэжҷ’Айԁ Її’ Ќйѳщ’ЇтМаиѳг Кнцмая etc. But facebook is banning the accounts who are using those type of stylish fonts, fake names.
Also, make sure that your name can’t include:
  • Titles of any kind (ex: professional, religious, etc)
  • Symbols, repeating characters or punctuation, unusual capitalization, and numbers
  • Words, phrases, or nicknames in the place of a middle name
  • Offensive or suggestive content of any kind
  • Characters from multiple languages


As per facebook rules, the profile name which you use should be your real name as it would be listed on your credit card, student ID, govt-issued proof etc. So I personally suggest everyone to keep your facebook account with a real name(without any fonts or special characters).
So if your profile name limit is exceeded and want to change your facebook profile name to real name, then click the below button,


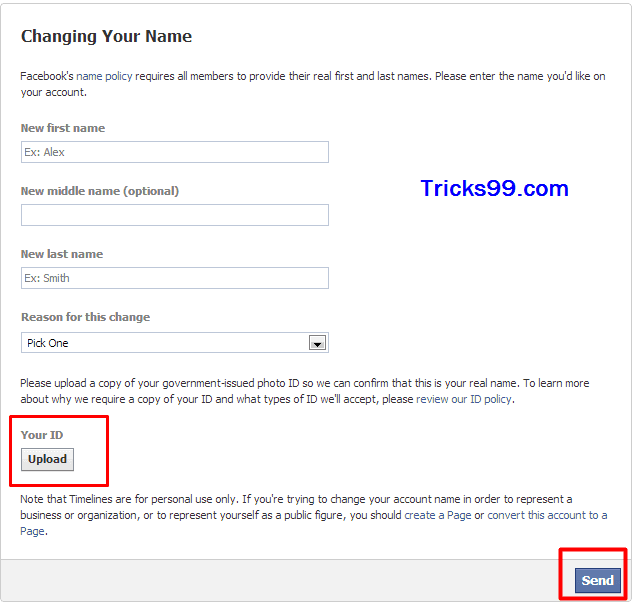
How-to-Change-Facebook-Profile-Name-after-Name-Limits-Reached.
Change Facebook Profile Name after Name Limits Reached


Fill that form and you have to upload your valid Government-issued Proof – photo ID like a Passport or Driver’s license etc and when your upload finishes, finally click “Send” button.
Any 1 Proof will be enough in the list of below examples,
Examples:
  • Green card, residence permit or immigration papers
  • Birth certificate
  • Personal or vehicle insurance card
  • Marriage certificate
  • Official name change paperwork
  • Voter ID card
  • Nondriver’s government ID (ex. disability, SNAP or national ID card)
Note: If you don’t have a government-issued Proof-photo ID, you can submit copies of any 2 other documents that hat together show your full name, birthday, and picture. Any 2 Proofs will be needed in the list of below examples,
Examples:
  • Credit card
  • Utility bill
  • School or work ID
  • Library card
  • Check
  • Bus card
For more information about the submission of proofs, check the facebook help center page by Clicking Here.


So when you submit your proofs, facebook staff will verify it and they will change your name to the real name as which was listed on the proofs that you submit. This whole process may take 4-5 days or 6-7 days like that. But we can’t say any exact prediction that they will change our name within the specific time. Mostly it will take 4-7 days.
Also, note that, when facebook staff verifies your proofs and changes your name, then you won’t be able to change your name again in future. All previous names which you had in your account will be removed. Only the new name will be seen and it will permanent.


My Personal Experience: Earlier I faced this problem and facebook asked me to submit any valid proof and I submitted my College ID card picture by taking a snap from my mobile. Facebook staff verified it and changed my name within 4-5 days. So I suggest you to take a clear picture of your proof either by scanning or by capturing from a good camera or mobile.


If you have any doubts or problems regarding this facebook profile name change after name limit reach then you can ask it in the below comments. :)

HOW TO MAKE SINGLE NAME ACCOUNT ON FACEBOOK OR HOW TO HIDE LAST NAME ON FACEBOOK.

Many people have been searching on Google about How to make Single Name account on Facebook? or How to Hide Last Name on Facebook? Well, here is a simple method explaining how to make single name account onfacebook successfully. But one thing you should make a note is Indonesians are officially allowed to have single name accounts on facebook as most of the people on Indonesia have only one name and that’s why facebook allows them to have single name.
So here what we are doing in this post is we’re pretending that we are from Indonesia. So I hope you understood the logic!! Also one thing you should know is only Indonesians are legally eligible to have this single name accounts and rest other country people are not!! So now it’s your wish whether to perform this trick or not. Simply I can skip all these warning steps and can directly tell you to just perform this trick so that I can gain visitors to this post. But I’m not that kind of person. I love my site readers. I always give high preference to their safety. So that’s why I have warned you about performing this one name process. :)
Steps for how to make Single name account (or) how to Hide last name on facebook:

Step 1: From your Mozilla Firefox browser, open your facebook account and go to “General Account Settings“.
Step 2: Change language settings to “Bahasa Indonesia“.
Step 3: Go to any of below links,http://www.proxynova.com/proxy-server-list/country-id/
(or)
http://www.hidemyass.com/proxy-list/
Select Proxy country=Indonesia, port=8080 & click ‘Update results’. Now copy the proxy address of port – 8080 from those results.
In general the proxy address will in this format – 61.247.45.35.
Just for example I’m giving you this proxy = 61.247.45.35. Try it,  but it may work or may not work.Mostly select new proxies which were updated there recently. [Check the time of recently updated proxies].While performing this process, some of the proxies may not work and some proxies will work just like 1 out of 3 trails. So be patient while doing this single name account process.
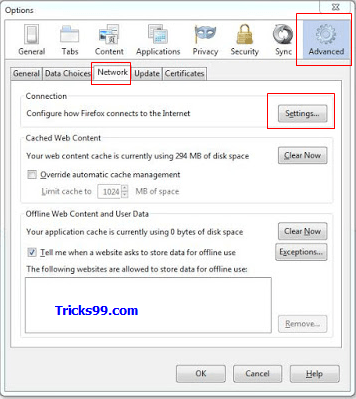
Step 4: Now you  have to change your Firefox browser proxy as shown in the below pictures,
Go to Tools > Options > Advanced > Network > Settings.
How to make Single Name Account on Facebook or How to Hide Last Name on Facebook.

Now click  ‘Settings’ and select “Manual proxy configuration:” – paste the proxy & port-8080 where you got from above 2 links-Proxynova.com or hidemyass.com and tick the box that says “Use this proxy server for all protocols” and finally click OK in settings dialog box.

How To Make Single Name Account on Facebook ? or How To Hide Last Name on Facebook ? ?
 
Step 5Now open your Name settings in your Fb. Simply remove your last name or leave it as empty and then click ‘Save Changes‘.
How To Make Single Name Account on Facebook ? or How To Hide Last Name on Facebook ? ?
http://solveproblems1minutes.blogspot.in/
Now your Facebook account is with the first name without last name. 😀 😀

How To Make Single Name Account on Facebook ? or How To Hide Last Name on Facebook ? ?
Step 6Now Change back your Language settings from “Bahasa Indonesia” to “English“.
Step 7: After completing all steps, remove ‘Manual proxy configuration:‘  in Firefox Settings and select “Use system proxy setting“. That’s it!! 😉


Note: You can make single name account only if your profile name limit is not exceeded.
If you have any doubts regarding how to make single name account on facebook or how to hide last name on facebook, you can ask in the below comments. You should also make a note that this method won’t work successfully at all the times. To be frank, it just depends upon luck which means selecting exact working proxy from the proxy sites. So nobody can tell you exactly whether this method works for you or not. Just try with different new proxies. Also, read the below comments for a while so that you may get any idea.
One of my friends has made a video in Youtube about the making of single name account on facebook. So I guess this video may help you for clear understanding of applying proxies in Mozilla Firefox browser to get a successful single name facebook account.

How To Add IP/Proxy Address Into Different Browsers

Proxy and IP address are specific address based on different computer, location and internet connection. Proxies are helpful in many different situations sometimes we are not able or don't have permission to access any specific website or other featured parts which are restricted in some areas or on specific device. Then by adding your own proxy you can easily access or complete any task you want to do. So this purpose this article of only for those who never play with their browser settings and don't have deep knowledge then this tutorial with helps to learn about proxy addition.

Add Proxies Into Different Browsers.


Settings For Mozilla Firefox

  • Open Your Mozilla Firefox >> Tools >> Options
  • Now Window will appear choose Advanced Tab at last.
  • In Advanced Tab click on Network and click on Settings button of connectionappear at first.
  • Then new window appear choose Manual proxy features and then your proxy in the place of HTTP box and also add Port no in the given box.
  • Just under the box of Proxy their is dialogue about Use this proxy for all protocols. Must check that box also if needed.
  • Then save down your settings now your proxies are working fine.

Settings For Google and Other Browsers


If you add proxy through Google chrome settings then it works not only for Google chrome also for all other browsers means proxy added through chrome work for whole internet connection.
  • Open Your Google Chrome Browser
  • From top right corner click on settings button >> Then Settings from list.
  • New window will appear scroll down your mouse and click on Show Advancedsettings.
  • Then Find change proxy settings appears in Network section.
  • Then new window will appear of Internet Properties click on Connections tab.
  • In connection tab there are settings option for Dial up connection and for LANconnection.
  • If your connection is Dial up then select it from the dial box and its settings button is just in right side or box.
  • But if your connection LAN connection then click on LAN settings.
  • Tick the box use this proxy for LAN/Dial up connection under Proxy servers section
  • Then Add your Proxy and port addresses.
  • After adding check the box of Bypass the proxy server for local settings option.
  • Now save down your all settings and proxies will start working.
These above settings are for Mozilla and Google Chrome but settings in chrome work for whole internet means no need to add manually in other browsers also.

Note:- In condition if you are not using Mozilla or chrome then for Manually addition proxy into device option your control panel and then find internet option same will appear as for chromesettings.

I hope you learn how to add proxy address into browser if you don't know yet before then this topic help to learn something new. For any question must ask me comments.

Create Animations From Images With DP Animation Maker

DP Animation Maker is a simple software that converts common images into moving animations. You can transform a simple PNG, JPG, BMP etc into an AV, GIF and an EXE file with excellent graphical effects. It contains many built in options to add effects like  rain, lightning, falling leaves, etc to make your still images into dynamic graphics. You can then save the graphic in GIF or AVI format. These can later be added to a website or can be used as a profile picture on a social networking website.
You can import images from the File menu via the Open Project option. From here, you can later add effects and save the project.
Import Image
Click on Add Animation button and select animations to add to the image. From here, you can also add other images and immerse them in the current image.
Add Effect
Your selected effects will be automatically added to the image and will continuously appear on the image, hence making it a moving graphic. As you can see the image below, the rotating lighting effect has been added to the image.
Lightning effectYou can edit the added effect(s) via the Edit Animation button from the left hand side menu and set animation boundaries. Multiple effects can also be added to a single image. For instance, the below image has grass, falling leaves and magic dust effects added to it which has transformed its look.
More Effects
To remove any effect, select it from the left hand side menu and click on the Remove button. You can save the created graphic as a GIF or AVI from the File menu or the buttons on the top of the main interface.
Remove Effect
The saved AVI file can then be played in a media player (e.g. Windows Media Player, VLC Player, etc) that supports AVI files. The still image hence becomes a moving graphic or video.
AVI
DP Animation Maker Works on Windows XP, Windows Vista and Windows 7.

Smart animation tool that lets you turn still images into life moving scenes.

Create living, breathing worlds from your still image with minimum effort. DP Animation Maker lets you make natural scenes burst with vibrancy and give motion to people and objects.
Free Download

Thursday, 8 October 2015

www.Gmail.com Login | Sign in | Sign up – How to Create New Account

www.Gmail.com Login – gmail.com is owned by Google, an it is one of the best free email service. Hopefully gmail is most successful and most used free email service. It was invented by Paul T. Buchheit an American Programmer. No doubt how he helped millions of people by invented www.gmail.com!

Gmail Sign Up is free service offered by Google and you can easily create new gmail account for free. Let’s check the tutorial about how to gmail sign up!
Step 1: Go to www.gmail.com, screen will appear as below
gmail sign up
gmail sign up
Step 2: As we have marked in above image, click on Create account then after clicking on it, new web page will be appear as below
create new gmail.com account
Step 3: Fill all genuine details there and click on Finish button. Now you’ll redirect to mobile verification page. You will get SMS from Google having 6 digit code. Enter the code there and your account will verified. You’ll redirected to gmail.com dashboard.
This is a simple process for gmail sign up. If you’ve any doubt related to how to create new gmail account then do comment below. We’ll answer as soon as possible.

Gmail Sign in – Gmail.com log in Guide

Before gmail sign in, you must have gmail username and password. If you  don’t  have then create new gmail account by above method. Let’s start tutorial on gmail log in!
gmail.com sign in
gmail.com sign in
Step 1: Go to official website www.gmail.com
Step 2: Here you’ll see gmail login page. Enter your email address/username there and click on nextbutton, now it’ll ask for password, enter it and hit Enter button. Done!
gmail sign in
gmail sign in

www.gmail.com Gmail Login Sign In Sign Up Create New Account

Hope you understood how to create new gmail account or gmail.com sign up and gmail.com sign in methods. If you find any problem while gmail sign up or login then don’t hesitate to comment. We’ll sort out it quickly.